There are two types of messages that can be sent through Mobile Resource Manager: regular messages that you enter your own information and messages that have Service Call information.
Setting up the Text Messaging Service
You must have the Text Settings created before you will be able to send messages. See Text Settings.
Regular Messages: You can send regular messages that contain information that you enter. See Sending Text.
Service Call Messages: There are specific fields that can be entered in pages that contain Service Call information. The information options that can be entered in the page are below:
| <CALLID> | <PROJNO> | <CUSTNAME> | <LOCID> | <LOCNAME> | <ADDRESS> |
| <CITY> | <STATE> | <ZIP> | <PHONE> | <DEPARTMENT> | <CALLTYPE> |
| <DESCRIPTION> | <DATESCHED> | <TIMESCHED> | <ESTHOURS> | <SCHEDCODE> |
HINT: If it is imperative that you include an additional field in the messages that is not listed here, please contact Support.
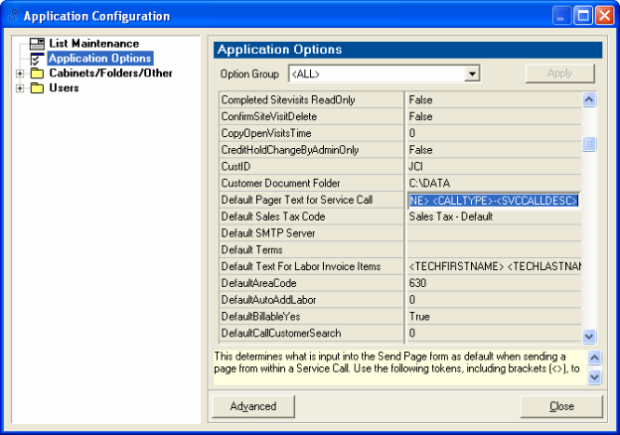
Follow the instructions below to change what is shown on the Service Call messages:
1. Click File
2. Click Administration
3. Click Application Configuration
4. Click Application Options
5. From the drop down list, choose “All”
6. Look for “Default Pager Text for Service Call”

7. Click in the right-side box
8. Notice the format of the fields: [Call No: 1234] ABC Inc. (630)566-8400; 8:00 am
The [ ] are used to separate the fields, You can use any character to separate the fields, such as semicolons.
9. Once you click in this box, text will appear in the yellow box at the bottom of the form. Scroll down to see what fields are allowed in pages.
10. Also notice the format of these fields (i.e. <DESCRIPTION>) The <> are required programming format. When entering new fields in pages, you must include the <> on both sides of the field name for it to work.
To add a field to the page, such as Description (Service Call Work Requested):
1. Scroll through the “Default Pager Text for Service Call” field and click where you want to enter the new field, such as after “TimeSched”.
2. Enter a semicolon and then hit the space bar a few times to separate “TimeSched” from “Description”
3. Type in exactly how it is shown in the yellow box: <DESCRIPTION>
4. Click Apply
5. Click Close
HINT: All pages will include the Description field in the page. If the entire page exceeds the given length (such as 150 characters) the page will be separated into 2 pages.